Final
Installation
Now that you have installed all the necessary
hardware there are still few more things you need to do before
switching on your PC for the first time. Your ATX case has
a power switch which turns the PC on, a reset switch for resetting
the system, a power LED which comes on when the PC is switched
on and a hard drive LED which flashes when data is being written
or read from your hard drive. You also have an internal speaker.
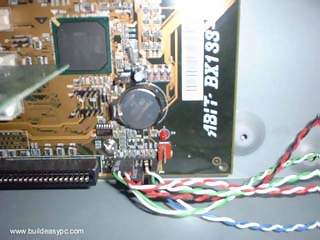
The switches and LED's need to be connected
to its corresponding connectors on the motherboard. Please
refer to your motherboard manual to locate where the connectors
are. Different motherboards place the connectors in different
locations. The connectors for the switches and LED's are normally
grouped together. They should look similar to the image below.
very
cable is normally labeled, they are normally named as follows,
but could be slightly different on your system.
Power switch
Power / PWR-SW
Reset switch Reset
Power LED Power LED / PWR-LED
Hard drive LED HDD-LED / IDE LED
Speaker SPK / Speaker
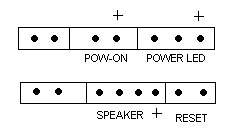
The connectors on the motherboard are also labeled but may
be too small to see. Instead refer to your motherboard manual
which would provide details on which pins you should connect
the cables to. The image below shows how the pins may be organised
on your motherboard.
Once
you have connected all the cables to the correct pins on the
motherboard, you are ready to switch the PC on. At this point
you can close the cover of your ATX case but don't screw it
on just yet as you might have possible problems that needs
rectifying. Connect all the cables to back of ATX case. These
includes the main power cable that connects to the power supply.
PS/2 mouse and keyboard that connects to the PS/2 ports. Monitor
cable that connects to the graphics card port, etc. Finally
the moment has arrived. Switch on your monitor first. Your
ATX power supply might have a main power switch at the back
so make sure that is switched on. Now switch the PC on by
pressing the power switch on the front of the ATX case. If
you have performed all the tasks without any mistakes and
providing that none of the main components are faulty, the
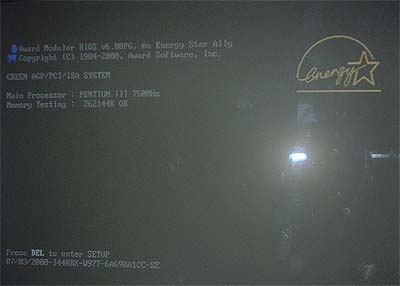
PC should boot. When the PC boots you should see the name
of the BIOS manufacturer, such as AWARD BIOS displayed on
your monitor. Your CPU type, speed and the amount of memory
should be displayed as shown on image below.
If
your motherboard has a plug and play BIOS and is set to automatic
device detection by default, then you would see your IDE devices
being detected followed by a prompt complaining about missing
operating system. If your motherboard does not detect the
hardware, then you need to proceed to the BIOS setup screen
by pressing DEL or F1 or F2 depending on your motherboard.
Congratulations you have completed building your own PC. You
now need to proceed to the software section which explains
how to setup the BIOS, Hard disk and install an operating
system.
>>
Back To Installation
|